Thursday, December 23, 2010

Remove map whitespace with an alternative “full extent”

This post describes a technique for calculating an adjusted “full extent” for a layer so that content can uniformly fill a map.

The following XAML will display simple map using ESRI’s ArcGIS API for Silverlight. The map contains the world topo map service from ArcGIS Online.

<UserControl
   x:Class="ESRI.PrototypeLab.DynamicDesign.MainPage"
   xmlns="http://schemas.microsoft.com/winfx/2006/xaml/presentation"
   xmlns:x="http://schemas.microsoft.com/winfx/2006/xaml"
   xmlns:d="http://schemas.microsoft.com/expression/blend/2008"
   xmlns:mc="http://schemas.openxmlformats.org/markup-compatibility/2006"
   xmlns:esri="http://schemas.esri.com/arcgis/client/2009" 
   mc:Ignorable="d"
   d:DesignHeight="600"
   d:DesignWidth="800"
   >
    <Grid Background="Gray">
        <esri:Map x:Name="Map">
            <esri:Map.Layers>
                <esri:ArcGISTiledMapServiceLayer
ID="topo"
Visible="True"
Url="http://services.arcgisonline.com/
ArcGIS/rest/services/World_Topo_Map/MapServer"
/>
            </esri:Map.Layers>
        </esri:Map>
    </Grid>
</UserControl>

The code behind below will zoom to the full extent of topo map service.

using System.Windows.Controls;

namespace ESRI.PrototypeLab.DynamicDesign {
    public partial class MainPage : UserControl {
        public MainPage() {
            InitializeComponent();

            // Zoom to full extent
            this.Map.Layers[0].Initialized += (s, e) => {
                this.Map.ZoomTo(this.Map.Layers[0].FullExtent);
            };
        }
    }
}

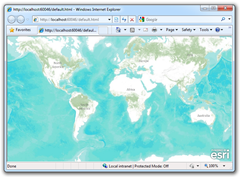
Depending on the aspect ratio of the browser, this will result in a map with “white space” (or whatever color you use for the background) at either the top/bottom or left/right as shown below.

Too much "white space"Too much "white space"

To address this I extended the Layer class with a method to return an adjusted full extent for the parent map.

using System.Windows;
using ESRI.ArcGIS.Client;
using ESRI.ArcGIS.Client.Geometry;

namespace ESRI.PrototypeLab.DynamicDesign {
    public static class LayerExtension {
        public static Envelope AdjustedFullExtent(this Layer layer,
FrameworkElement parent) {
            Envelope extent = layer.FullExtent;
            double ratioMap = parent.ActualHeight / parent.ActualWidth;
            double ratioLay = extent.Height / extent.Width;
            if (ratioMap < ratioLay) {
                return new Envelope() {
                    XMin = extent.XMin,
                    YMin = extent.GetCenter().Y - 0.5d * ratioMap *
extent.Width,
                    XMax = extent.XMax,
                    YMax = extent.GetCenter().Y + 0.5d * ratioMap *
extent.Width
                };
            }
            return new Envelope() {
                XMin = extent.GetCenter().X - 0.5d *
extent.Height / ratioMap,
                YMin = extent.YMin,
                XMax = extent.GetCenter().X + 0.5d *
extent.Height / ratioMap,
                YMax = extent.YMax
            };
        }
    }
}

Let’s modify the code behind to use the new method, AdjustedFullExtent, defined above.

using System.Windows.Controls;

namespace ESRI.PrototypeLab.DynamicDesign {
    public partial class MainPage : UserControl {
        public MainPage() {
            InitializeComponent();

            // Zoom to full extent
            this.Map.Layers[0].Initialized += (s, e) => {
                this.Map.ZoomTo(
this.Map.Layers[0].AdjustedFullExtent(this.Map));
            };
        }
    }
}

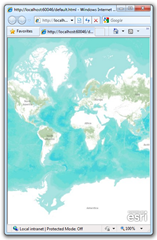
Now, when the application starts, the layer will fill the entire map regardless of the browsers aspect ratio.

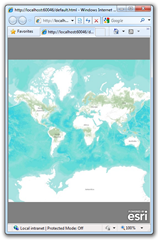
No more "white space" No more "white space"

Tuesday, December 7, 2010

How to add “ScrollIntoView” to an ItemsControl

The ListBox control (in Silverlight or WPF) has a handy method called ScrollIntoView that forces a listbox scroll so that the parsed item is in view.  This post will describe how to add this capability to an ItemsControl.

Firstly, to enable vertical scrolling in an ItemsControl apply the following template.

<ItemsControl x:Name="myItemsControl">

    <ItemsControl.Template>
        <ControlTemplate>
            <ScrollViewer Padding="{TemplateBinding Padding}">
                <ItemsPresenter />
            </ScrollViewer>
        </ControlTemplate>
    </ItemsControl.Template>
</ItemsControl>

Next, add the following class that extends the ItemsControl class with an overloaded “Scroll Into View” method.

using System.Windows;
using System.Windows.Controls;

namespace myNamespace {
    public static class Extensions {
        public static void ScrollIntoView(
this ItemsControl control,
object item) {
            FrameworkElement framework =
control.ItemContainerGenerator.ContainerFromItem(item)
as FrameworkElement;
            if (framework == null) { return; }
            framework.BringIntoView();
        }
        public static void ScrollIntoView(this ItemsControl control) {
            int count = control.Items.Count;
            if (count == 0) { return; }
            object item = control.Items[count - 1];
            control.ScrollIntoView(item);
        }
    }
}

With this extension you can force the ItemsControl to scroll to a specific item, or alternatively, using the overloaded method, simply scroll to the last item in the collection.  For example.

this.myItemsControl.ScrollIntoView();

Tuesday, November 23, 2010

Mosaic Image Finder for ArcMap

Mosaic Image Finder for ArcMap

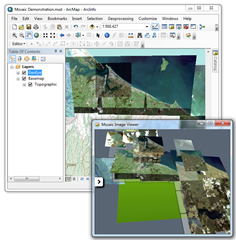
The Mosaic Image Finder is a new add-in for ArcMap to explore imagery within a mosaic.  The add-in supports mosaics stored locally in a geodatabase (or SDE connection) and mosaics published to ArcGIS Server as image services.

Mosaic Image Finder for ArcMap  Mosaic Image Finder for ArcMap

When a mosaic layer is dropped on to the Mosaic Image Finder window, thumbnails of mosaic images that overlap the current map extent are displayed in the three dimensional viewer as shown above. The images can be sorted vertically based on any numeric field.

The aim of this add-in was to provide an intuitive user interface for sorting and searching imagery in a mosaic. This add-in is particularly useful when mosaics contain good attribution and images are plentiful at an area of interest. When an image is selected, as indicated above with a red outline, it can be added to ArcMap as a new layer.

The add-in (with source code) can be downloaded from the ArcGIS Resource Center here. The download page contains installation instructions.

The Mosaic Image Finder window is created using WPF 3D (.NET). One of the difficulties when developing this application was creating a threading model for background image requests. If images were downloaded in the UI thread then ArcMap would totally lock-up. Even though background threads can use ArcObjects, it is not recommended to parse ArcObject references between threads, doing so will cause cross-thread issues such as a severe performance hit.  When possible I created proxy classes to assist with the exchange of simple data types like IEnvelope. However to parse a Layer I was forced to persist the layer to file and have it opened in the background thread, not the best but unavoidable.

Monday, November 22, 2010

3D Video Capture with hacked Xbox 360 Kinect

image

Last week Oliver Kreylos released this video on youtube showing a hacked Xbox 360 Kinect being used to generate 3D video. Amazing! It is no surprise that there has been almost 1.4 million views during the past week.

There are, of course, a tremendous number of possible applications of this technology. Many of which are impractical (like most augmented reality applications) but others may have promise. Interior mapping and video change detection are two fields that may benefit from variants of this technology.

In more recent videos Kreylos discusses options to achieve a true 360° 3D video. One option is to use two Kinect devices, with polarized filters, facing opposite each other. The filters would prevent one device from accidentally processing infrared beams from the opposing device. Software would then automagically stitch the two 3D video feeds together.

How to sort a list using a delegate

Sorting is a fundamental part software development. This post will review a technique of sorting generic lists with inline delegates.

First, let’s define an elementary class that we will collect and ultimately sort.

public class Person {
    public string Name { get; set; }
    public int Age { get; set; }
}

The following class, Family, will create a collection of persons and exposes two sorting methods. One method will sort the collection based on age and the other on name. These methods use inline delegates to specify the sorting logic, or more specifically, the logic to compare two individual people. Both methods use inline delegates but use slightly different syntax. The last method will print the names and ages of people in the collection. To print this information you must have your solution set to debug mode and “Debug” selected in the output window.

public class Family {
    public List<Person> _people = new List<Person>();
    public Family() {
        this._people = new List<Person>();
        this._people.Add(new Person() { Name = "Bob", Age = 43 });
        this._people.Add(new Person() { Name = "Jim", Age = 10 });
        this._people.Add(new Person() { Name = "Larry", Age = 15 });
        this._people.Add(new Person() { Name = "John", Age = 30 });
        this._people.Add(new Person() { Name = "Mary", Age = 8 });
    }
    public void SortFamilyByAge() {
        this._people.Sort(
            delegate(Person a, Person b) {
                return a.Age.CompareTo(b.Age);
            }
        );
    }
    public void SortFamilyByName() {
        this._people.Sort(
            (Person a, Person b) => {
                return a.Name.CompareTo(b.Name);
            }
        );
    }
    public void PrintFamily() {
        this._people.ForEach(
            p => {
                Debug.WriteLine(string.Format("{0} ({1})", p.Name, p.Age));
            }
        );
        Debug.WriteLine(Environment.NewLine);
    }
}

And finally, the following code will instantiate the family object and run the two sort methods, sort by age and sort by name.

Family family = new Family();
family.SortFamilyByAge();
family.PrintFamily();
family.SortFamilyByName();
family.PrintFamily();

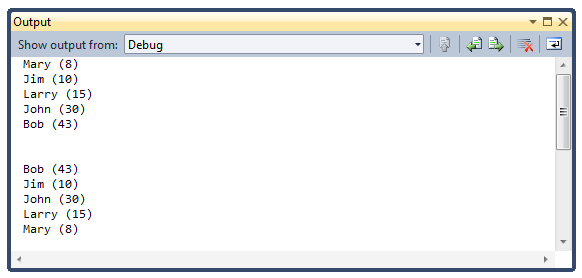
The code will produce the following output.

How to sort a list using a delegate

Friday, November 19, 2010

How to export a map to PDF (client-side)

 How to export a map to PDF (client-side)

This post will describe a technique for exporting a map created with the ArcGIS API for Silverlight to a PDF document completely client-side (no server-side computing).

You will need:

  1. Microsoft Visual Studio 2010 (link)
  2. Microsoft Silverlight 4 Tools for Visual Studio 2010 (link)
  3. ESRI ArcGIS API for Silverlight (link)
  4. silverPDF from codeplex (link)

How to build a map that can be saved to PDF:

Step 1 – In VS2010, create a new Silverlight Application called “SilverlightApplication1”, accept all the default options.

Step 2 – Add a reference to the ESRI’s ArcGIS API for Silverlight and silverPDF from codeplex.

Step 3 – Add the following to MainPage.xaml

<UserControl x:Class="SilverlightApplication1.MainPage"
   xmlns="http://schemas.microsoft.com/winfx/2006/xaml/presentation"
   xmlns:x="http://schemas.microsoft.com/winfx/2006/xaml"
   xmlns:d="http://schemas.microsoft.com/expression/blend/2008"
   xmlns:mc="http://schemas.openxmlformats.org/markup-compatibility/2006"
    xmlns:esri="http://schemas.esri.com/arcgis/client/2009"
   mc:Ignorable="d"
   d:DesignHeight="300" d:DesignWidth="400">
    <Grid x:Name="LayoutRoot" Background="White">
        <esri:Map x:Name="Map">
            <esri:ArcGISTiledMapServiceLayer
Url="http://services.arcgisonline.com/ArcGIS/rest/services/World_Imagery/MapServer" />
        </esri:Map>
        <Button x:Name=
"ButtonPdf"
HorizontalAlignment=
"Left"
VerticalAlignment=
"Bottom"
Margin=
"10,0,0,10"
IsEnabled="False"
Content="Create PDF"/
>
    </Grid>
</UserControl>

Step 4 – Add the following to MainPage.xaml.cs (code behind)

using System;
using System.Net;
using System.Windows;
using System.Windows.Controls;
using System.Windows.Resources;
using ESRI.ArcGIS.Client;
using ESRI.ArcGIS.Client.Geometry;
using PdfSharp.Drawing;
using PdfSharp.Pdf;

namespace SilverlightApplication1 {
    public partial class MainPage : UserControl {
        public MainPage() {
            InitializeComponent();

            // Listen to "Create PDF" button click
            this.ButtonPdf.Click += new RoutedEventHandler(this.Button_Click);

            // Enable "Create PDF" button only after the Imagery layer has loaded
            this.Map.Layers[0].Initialized += (s, e) => {
                this.ButtonPdf.IsEnabled = true;

                // Also, zoom to an adjusted full extent that fills the map canvas
                this.Map.ZoomTo(this.Map.Layers[0].FullExtent(this.Map));
            };
        }
        private void Button_Click(object sender, RoutedEventArgs e) {
            // Create a Save As dialog
            SaveFileDialog dialog = new SaveFileDialog();
            dialog.Filter = "PDF|*.pdf";

            // Show dialog. Exit if use closes dialog.
            if (!dialog.ShowDialog().Value) { return; }

            // Get the current tiled layer
            ArcGISTiledMapServiceLayer tiled = this.Map.Layers[0]
as ArcGISTiledMapServiceLayer;

            // Create a new dynamic layer from the same map service
            ArcGISDynamicMapServiceLayer dynamic = new ArcGISDynamicMapServiceLayer() {
                Url = tiled.Url,
                ImageFormat = ArcGISDynamicMapServiceLayer.RestImageFormat.JPG
            };

            // When the dynamic layer has initialized create the in-memory PDF document
            dynamic.Initialized += (a, b) => {
                dynamic.GetUrl(
                    this.Map.Extent,
                    (int)this.Map.ActualWidth,
                    (int)this.Map.ActualHeight,
                    delegate(string url, int width, int height, Envelope extent) {

                        // Download a new image of identical to what is currently
// displayed in the map

                        WebClient webClient = new WebClient();
                        webClient.OpenReadCompleted += (c, f) => {

                            // Use the dispatcher to force execution in the UI thread
                            Dispatcher.BeginInvoke(delegate() {
                                // Create the PDF document.
// Set document information properties.

                                PdfDocument document = new PdfDocument();
                                document.Info.Title = "World Imagery";

                                // Create a new page with the same dimensions as
// the browser map

                                PdfPage page = new PdfPage(document) {
                                    Height = new XUnit(this.Map.ActualHeight,
XGraphicsUnit.Presentation),
                                    Width = new XUnit(this.Map.ActualWidth,
XGraphicsUnit.Presentation)
                                };
                                document.Pages.Add(page);

                                // Create a graphics object for writing to the page
                                XGraphics graphics = XGraphics.FromPdfPage(page);

                                // Add the map image to the page
                                XImage map = XImage.FromStream(f.Result);
                                graphics.DrawImage(map, 0d, 0d);

                                // Save the PDF document to the user specified filename
                                document.Save(dialog.OpenFile());

                                // Inform the user that the PDF creation is complete
                                MessageBox.Show("PDF Creation Complete");
                            });
                        };
                        webClient.OpenReadAsync(new Uri(url));
                    }
                );
            };
            dynamic.Initialize();
        }
    }
    /// <summary>
    /// Extends the Esri Layer class with an alternative FullExtent property.
    /// Returns an adjusted extent conceptually similar to Image.Stretch==UniformToFill
    /// </summary>
    public static class LayerExtension {
        public static Envelope FullExtent(this Layer layer, FrameworkElement parent) {
            Envelope extent = layer.FullExtent;
            double ratioMap = parent.ActualHeight / parent.ActualWidth;
            double ratioLay = extent.Height / extent.Width;
            if (ratioMap < ratioLay) {
                return new Envelope() {
                    XMin = extent.XMin,
                    YMin = extent.GetCenter().Y - 0.5d * ratioMap * extent.Width,
                    XMax = extent.XMax,
                    YMax = extent.GetCenter().Y + 0.5d * ratioMap * extent.Width
                };
            }
            return new Envelope() {
                XMin = extent.GetCenter().X - 0.5d * extent.Height / ratioMap,
                YMin = extent.YMin,
                XMax = extent.GetCenter().X + 0.5d * extent.Height / ratioMap,
                YMax = extent.YMax
            };
        }
    }
}

The web application is now ready to run in debug.  When the application loads, use your mouse (and mousewheel) to navigate to your favorite location on the planet.  Click the “Create PDF” button to commence the PDF export.  You will first be prompted for the output location of the PDF document and then again when the export is complete.

Thursday, October 28, 2010

How to support drag’n’drop with Silverlight on Mac

Silverlight 4 introduced support for drag and drop. That is, developers have access to files like images or videos that are dropped into Silverlight-based web application.

Unfortunately, as discussed in this thread, this capability does not work very well on a Mac. The issue is described briefly in this MSDN article but this post will provide a easily to implement (and painless) workaround.

These changes only affect the HTML page hosting the Silverlight control.  You do not need to make any change to your Silverlight project.

To start, add the text highlighted below.

<body>
    <form id="form1" runat="server" style="height:100%">
   
<div id="silverlightControlHost">
       
<object id="plugin" data="data:application/x-silverlight-2," ...
            <param name="source" value="..."/>
           
<param name="onError" value="onSilverlightError" />
           
<param name="onLoad" value="onSilverlightLoad" />
           
<param name="background" value="white" />
           
<param name="minRuntimeVersion" value="4.0.50826.0" />
           
<param name="autoUpgrade" value="true" />
           
<a href="http://go.microsoft.com/fwlink/...
               
<img src="http://go.microsoft.com/fwlink/...
           
</a>
       
</object><iframe id="_sl_historyFrame" style=...
   
</form>
</body>
</html>

Next, immediately below the boilerplate “onSilverlightError” JavaScript function, append the following six functions.

function onSilverlightLoad(sender, args) {
    if (window.navigator.userAgent.indexOf('Safari') >= 0) {
        var objControl = document.getElementById('plugin');
        objControl.addEventListener('dragenter',
            onSilverlight_HandleDragEnter, false);
        objControl.addEventListener('drop',
            onSilverlight_handleDropEvent, false);
        objControl.addEventListener('dragover',
            onSilverlight_HandleDragOver, false);
        objControl.addEventListener('dragleave',
            onSilverlight_HandleDragLeave, false);
    }
}
function onSilverlight_HandleDragEnter(oEvent) {
    // Prevent default operations in DOM
    oEvent.preventDefault();
    var flag = oEvent.target.dragEnter(oEvent);
    // If handled, then stop propagation of event in DOM
    if (flag) { oEvent.stopPropagation(); }
}
function onSilverlight_HandleDragOver(oEvent) {
    // Prevent default operations in DOM
    oEvent.preventDefault();
    var flag = oEvent.target.dragOver(oEvent);
    // If handled, then stop propagation of event in DOM
    if (flag) { oEvent.stopPropagation(); }
}
function onSilverlight_HandleDragLeave(oEvent) {
    // Prevent default operations in DOM
    oEvent.preventDefault();
    var flag = oEvent.target.dragLeave(oEvent);
    // If handled, then stop propagation of event in DOM
    if (flag) { oEvent.stopPropagation(); }
}
function onSilverlight_handleDropEvent(oEvent) {
    // Prevent default operations in DOM
    oEvent.preventDefault();

    var newEvent = Silverlight_clone(oEvent);
    newEvent.clientX = 80;
    newEvent.clientY = 80;
    newEvent.x = 80;
    newEvent.y = 80;
    newEvent.offsetX = 80;
    newEvent.offsetY = 80;

    var flag = oEvent.target.dragDrop(newEvent);
    // If handled, then stop propagation of event in DOM
    if (flag) { oEvent.stopPropagation(); }
}
function Silverlight_clone(o) {
    var c = {};
    var p, v;
    for (p in o) {
        if (o.hasOwnProperty(p)) {
            v = o[p];
            c[p] = v;
        }
    }
    return c;
}
 

You are now good to go!

This code is based primarily on the solution provided by Olego in this forum.

Wednesday, July 21, 2010

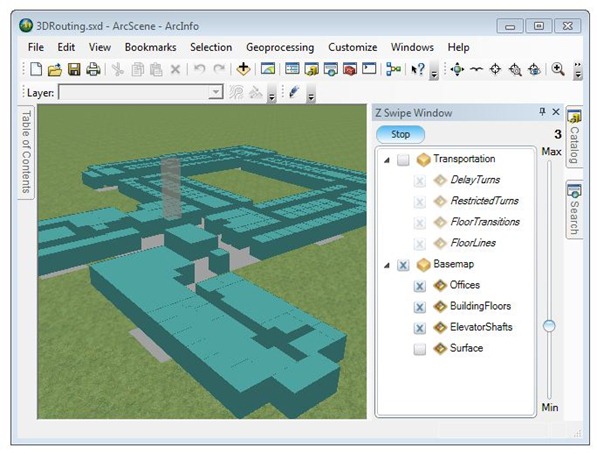
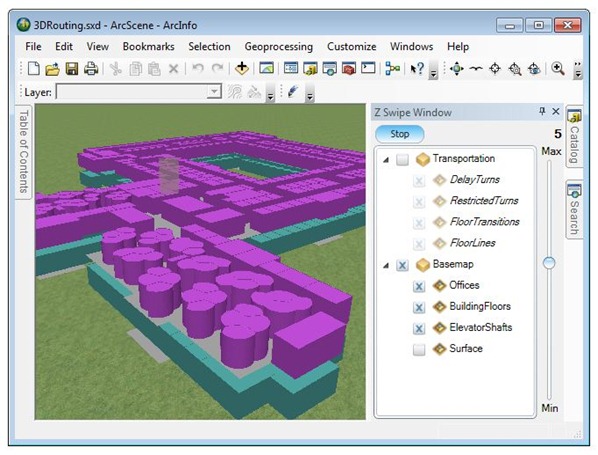
Z Swipe Tool for ArcGIS Desktop 10

Z Swipe Tool for ArcGIS Desktop 10

Z Swipe Tool for ArcGIS Desktop 10

ESRI’s Applications Prototype Lab has just published a new addin to the code gallery called the Z Swipe Tool.  The addin allows users to filter features in ArcScene based on vertical position using a slider.  Under-the-hood, the addin works by dynamically amending the definition queries of participating layers.  The Z Swipe Window (pictured above) contains a tree view for users to select (or de-select) participating layers.

The addin is ideal for working with documents with vertically concurrent features such as floors and services of a high-rise building.

The addin is available here and includes full source code.

Tuesday, July 20, 2010

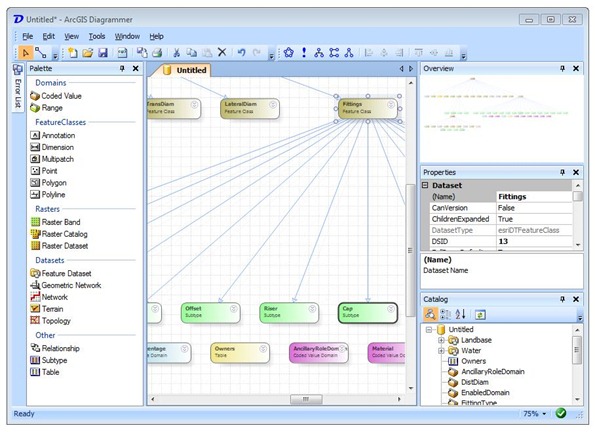
ArcGIS Diagrammer for ArcGIS 10 Released

ArcGIS Diagrammer

ArcGIS Diagrammer is now available for the newly released ArcGIS 10.  The application can be downloaded here from the new code gallery on the ArcGIS resource center.

If you still have ArcGIS Desktop 9.2 or 9.3 then you can still use the previous version available here on ArcScripts.

The most significant change or addition to Diagrammer in the 10 release is the addition of Terrain dataset support.  Unfortunately we could not add support for mosaic datasets because they currently do not support xml serialization, that is, terrains are currently omitted from xml workspace documents exported from geodatabases.  Diagrammer also needed to be updated to reflect changes to how ArcGIS 10 manages metadata.  Overall it is basically the same Diagrammer you love or hate.  :-)

If you think that concepts presented in ArcGIS Diagrammer (and other samples like XRay) should be formally ported into the core ArcGIS product then please voice your opinion on ESRI’s ideas forum.

Friday, July 16, 2010

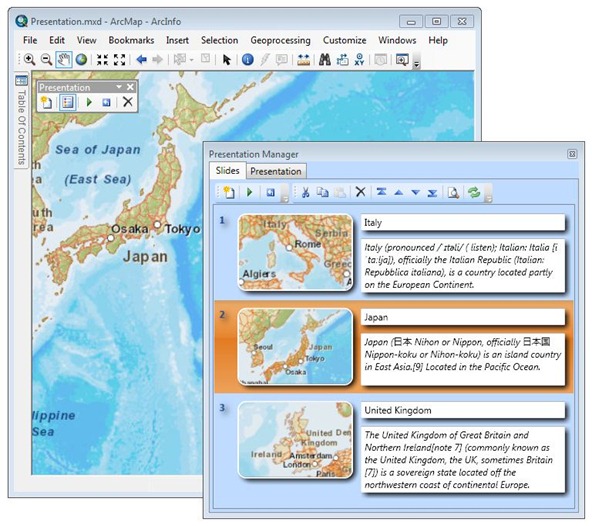
Presentation AddIn for ArcGIS Desktop 10

Presentation AddIn for ArcGIS Desktop 10

About this time last year, the Applications Prototype Lab at ESRI published a presentation tool for ArcGIS 9.2/9.3.  That release is discussed here and can be downloaded from the old code gallery here.

Today, the lab released a new version of the presentation tool as an AddIn for ArcGIS 10.  This AddIn is similar to the presentation capability recently added to ArcGIS Explorer.  The AddIn can be downloaded here from the new code gallery.

The AddIn was developed in C# for .NET 3.5 and utilizes the graphics capabilities of WPF.  Full source code is provided with the code gallery download.

Thursday, July 15, 2010

Touch for ArcGIS Desktop 10

Touch for ArcGIS Desktop

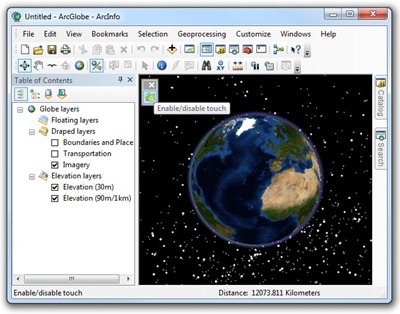
Just published on the ArcGIS Resource Center is a proof-of-concept developed by the ESRI’s Applications Prototype Lab called Touch for ArcGIS Desktop. This contribution is an AddIn that adds touch navigation to ArcGlobe.  The contribution can be downloaded from here and includes the AddIn itself and full source code.  The download page includes instructions how to install and use the AddIn.

The AddIn will install on any computer running ArcGIS 10 but a warning message will appear if you do not have a Windows 7 Touch-enabled device connected.

This AddIn is based on code from the Windows 7 Multitouch .NET Interop Sample Library.

GeoTagger for ArcGIS Desktop 10

Geotagging text from an English web page  Geotagging text from an Arabic web page

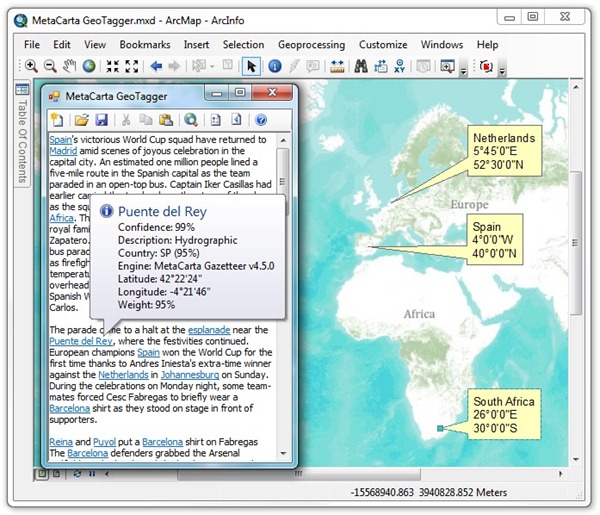
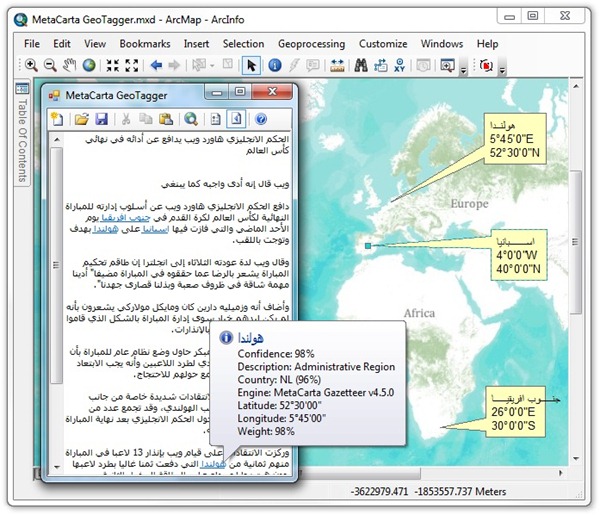
Have you ever wanted to extract geographic locations from an email or web page? This is now possible with the free GeoTagger AddIn for ArcGIS Desktop 10 published by the Applications Prototype Lab. The AddIn uses MetaCarta’s public geotagging web service to extract geographic references from text. The service supports English, Russian, Spanish and Arabic.

The AddIn is available here from ESRI’s ArcGIS Resource Center.  The download page includes usage and installation instructions.  Source code is bundled with the download.

Wednesday, July 14, 2010

Dynamic Charting for ArcGIS Desktop 10

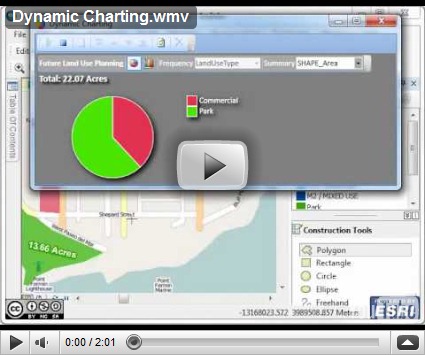
Late last year ESRI’s Applications Prototype Lab released the dynamic charting tool for ArcGIS Desktop 9.2/9.3.  This tool provided the unique ability to display dynamic pie charts during editing operations.

Today, the lab released a new version of the tool for the newly launched ArcGIS Desktop 10.  The tool features a number of improvements:

  • Ability to switch between a pie chart and a column chart,
  • Ability to pick any summary field other than area, for example, cost or mineral volume,
  • Improved performance, the charts are only updated following an editing operation such as an add or delete.  Previously updates occurred at regular time intervals.
  • The legend is now sorted alphabetically,
  • And mostly importantly, the user interface colors have been toned down.  :-)

The new tool can be downloaded from the ArcGIS Resource Center from this link.  The download includes full source code.  The tool is developed as a desktop AddIn and is written in C# using WPF and the WPF Toolkit.

Tuesday, June 29, 2010

Cloning Path Geometry in Silverlight

image

To add depth to a line rendered on a map, I experimented with the drop shadow bitmap effect. The shadow looked great but it had a heavy performance cost. As a workaround, I substituted the bitmap effect with a cloned path. Unfortunately Silverlight does not support path geometry cloning, unlike WPF, so based on a Silverlight.net forums thread I implemented a value converter that clones path geometry.

The second path below is the original street route displayed in blue above. The first path clones the blue path’s geometry and offsets it by a few pixels.

<Path Opacity="0.5"
      StrokeThickness="5"
      StrokeLineJoin="Round"
      Stroke="Gray"
      Data="{Binding ElementName=Element,
                     Path=Data,
                     Mode=OneWay,
                     Converter={StaticResource GeometryConverter}}">
    <Path.Resources>
        <local:GeometryConverter x:Key="GeometryConverter"/>
    </Path.Resources>
    <Path.RenderTransform>
        <TranslateTransform X="6" Y="6" />
    </Path.RenderTransform>
</Path>
<Path x:Name="Element"
StrokeThickness="5"
StrokeLineJoin="Round"
Stroke="Blue"/>

Below is the code for the value converter.  The code uses reflection to clone the geometry of the original path.

public class GeometryConverter : IValueConverter {
    public object Convert(object value, Type targetType,
object parameter, CultureInfo culture) { // Test for Null if (value == null) { return null; } Geometry g = value as Geometry; if (g == null) { return null; } Geometry clone = Clone(g) as Geometry; return clone; } public object ConvertBack(object value, Type targetType,
object parameter, CultureInfo culture) { throw new NotImplementedException(); } private static object Clone(Object obj) { // Get all properties and clone them. PropertyInfo[] properties = obj.GetType().GetProperties(); object cloneObj = obj.GetType().GetConstructors()[0].Invoke(null); foreach (PropertyInfo property in properties) { object value = property.GetValue(obj, null); if (value != null) { if (IsPresentationFrameworkCollection(value.GetType())) { object collection = property.GetValue(obj, null); int count = (int)collection.GetType().
GetProperty("Count").GetValue(collection, null); for (int i = 0; i < count; i++) { // Get each child of the collection. object child = collection.GetType().
GetProperty("Item").
GetValue(collection, new Object[] { i }); object cloneChild = Clone(child); object cloneCollection = property.
GetValue(cloneObj, null); collection.GetType().
InvokeMember("Add",
BindingFlags.InvokeMethod,
null,
cloneCollection,
new object[] { cloneChild }); } } // If the property is a UIElement, we also need to clone it. else if (value is UIElement) { object obj2 = property.PropertyType.
GetConstructors()[0].Invoke(null); Clone(obj2); property.SetValue(cloneObj, obj2, null); } // For a normal property, its value doesn't need to be
// cloned.
So just copy its value to the new object. else if (property.CanWrite) { property.SetValue(cloneObj, value, null); } } } return cloneObj; } private static bool IsPresentationFrameworkCollection(Type type) { if (type == typeof(object)) { return false; } if (type.Name.StartsWith("PresentationFrameworkCollection")) { return true; } return IsPresentationFrameworkCollection(type.BaseType); } }

Wednesday, May 19, 2010

Moveable graphics with ESRI’s ArcGIS API for Silverlight

image

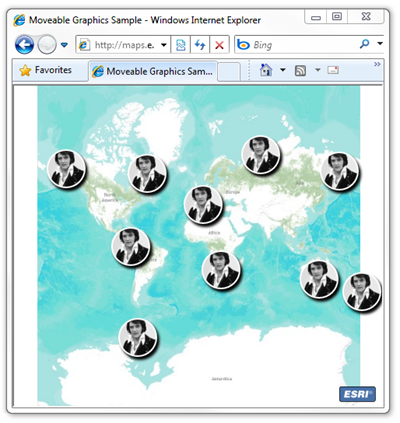
By default, graphics added to an ESRI Silverlight map are static.  This post will demonstrate how to add map behavior so that graphics can be repositioned with regular mouse interaction.  In some situations, providing moveable graphics is a more intuitive method of achieving user interaction.  For example, you could have a moveable start and end pushpin in a routing application.

In this sample, the web application will create ten Elvis symbols at random locations.  Whenever a graphic is added to the map, the application will begin for listen for mouse events (on the graphic).  When there is a LeftMouseButtonDown event on a graphic, a DragGraphic object is created.  This class stores a reference to the selected graphic and the original position of the graphic and mouse cursor.  If the mouse moves again the graphic or map, information from the DragGraphic class is used to update the selected graphic’s position.

To view a live sample, please click the link below.
http://maps.esri.com/sldemos/mg/default.html

<UserControl
    x:Class="MoveableGraphicsSample.MainPage"
    xmlns:esri="clr-namespace:ESRI.ArcGIS.Client;assembly=ESRI.ArcGIS.Client"
    xmlns:esriSymbols="clr-namespace:ESRI.ArcGIS.Client.Symbols;
assembly=ESRI.ArcGIS.Client"
xmlns
="http://schemas.microsoft.com/winfx/2006/xaml/presentation" xmlns:x="http://schemas.microsoft.com/winfx/2006/xaml" xmlns:d="http://schemas.microsoft.com/expression/blend/2008" xmlns:mc="http://schemas.openxmlformats.org/markup-compatibility/2006" mc:Ignorable="d" d:DesignHeight="300" d:DesignWidth="400"> <Grid Background="White"> <esri:Map Name="Map"> <esri:Map.Resources> <esriSymbols:MarkerSymbol x:Key="Elvis"> <esriSymbols:MarkerSymbol.ControlTemplate> <ControlTemplate> <Grid> <Ellipse Height="50" Width="50"
Cursor="Hand" Stroke
="White"
StrokeThickness
="2"> <Ellipse.Fill> <!-- see http://commons.wikimedia.org/wiki/File:Elvis_Presley_1970.jpg –> <ImageBrush Stretch="UniformToFill" ImageSource="http://upload.wikimedia.org/wikipedia/commons/8/82/
Elvis_Presley_1970.jpg" /> </
Ellipse.Fill
> <Ellipse.Effect> <DropShadowEffect /> </Ellipse.Effect> <Ellipse.RenderTransform> <TranslateTransform X="-25"
Y
="-25"/> </Ellipse.RenderTransform> </Ellipse> </Grid> </ControlTemplate> </esriSymbols:MarkerSymbol.ControlTemplate> </esriSymbols:MarkerSymbol> </esri:Map.Resources> <esri:Map.Layers> <esri:ArcGISTiledMapServiceLayer
Url
="http://server.arcgisonline.com/ArcGIS/rest/services/
World_Topo_Map/MapServer"/> <
esri:GraphicsLayer
/> </esri:Map.Layers> </esri:Map> </Grid> </UserControl>

…and the code behind….

using System;
using System.Collections.Specialized;
using System.Windows.Controls;
using ESRI.ArcGIS.Client;
using ESRI.ArcGIS.Client.Geometry;
using ESRI.ArcGIS.Client.Symbols;

namespace MoveableGraphicsSample {
    public partial class MainPage : UserControl {
        private DragGraphic _dragGraphic = null;
        private Random _random = new Random();

        public MainPage() {
            InitializeComponent();

            // Get layers
            ArcGISTiledMapServiceLayer topoLayer = this.Map.Layers[0]
as ArcGISTiledMapServiceLayer; GraphicsLayer graphicsLayer = this.Map.Layers[1]
as GraphicsLayer;
// Wait until the map service layer has loaded and initialized topoLayer.Initialized += (a, b) => { for (int i = 0; i < 10; i++) { graphicsLayer.Graphics.Add( new Graphic() { // Create a random location Geometry = new MapPoint() { X = topoLayer.InitialExtent.XMin +
this._random.NextDouble() *
(topoLayer.InitialExtent.XMax -
topoLayer.InitialExtent.XMin), Y = topoLayer.InitialExtent.YMin +
this._random.NextDouble() *
(topoLayer.InitialExtent.YMax -
topoLayer.InitialExtent.YMin) },
// Use the markersymbol defined in the resource Symbol = this.Map.Resources["Elvis"]
as
MarkerSymbol } ); } }; graphicsLayer.Graphics.CollectionChanged += (a, b) => { // Exit if not added graphic if (b.Action != NotifyCollectionChangedAction.Add) { return;} // Get added graphic Graphic graphic = b.NewItems[0] as Graphic; // When the graphic is clicked, store the current state graphic.MouseLeftButtonDown += (sender, e) => { this._dragGraphic = new DragGraphic() { Graphic = graphic, GraphicOrigin = graphic.Geometry as MapPoint, MouseOrigin = this.Map.ScreenToMap(e.GetPosition(null)) }; e.Handled = true; }; // When the mouse is moved update the graphic's position graphic.MouseMove += (sender, e) => { if (this._dragGraphic == null) { return; } this._dragGraphic.Graphic.Geometry = new MapPoint() { X = this._dragGraphic.GraphicOrigin.X +
(this.Map.ScreenToMap(e.GetPosition(null)).X -
this._dragGraphic.MouseOrigin.X), Y = this._dragGraphic.GraphicOrigin.Y +
(this.Map.ScreenToMap(e.GetPosition(null)).Y -
this._dragGraphic.MouseOrigin.Y) }; };
// Clear the seleced graphic on mouse up graphic.MouseLeftButtonUp += (sender, e) => { this._dragGraphic = null; }; }; // Adjust the selected graphics position if the mouse moves this.Map.MouseMove += (sender, e) => { if (this._dragGraphic == null) { return; } this._dragGraphic.Graphic.Geometry = new MapPoint() { X = this._dragGraphic.GraphicOrigin.X +
(this.Map.ScreenToMap(e.GetPosition(null)).X -
this._dragGraphic.MouseOrigin.X), Y = this._dragGraphic.GraphicOrigin.Y +
(this.Map.ScreenToMap(e.GetPosition(null)).Y -
this._dragGraphic.MouseOrigin.Y) }; }; } } public class DragGraphic { public Graphic Graphic { get; set; } public MapPoint MouseOrigin { get; set; } public MapPoint GraphicOrigin { get; set; } } }