Friday, March 4, 2011

Google Custom Search in C#

This post contains a C# class to search the internet using Google’s custom search API. Before using this class you must first create a Google account (link) and generate an API key (link).

Unfortunately, this code cannot be used directly from a Silverlight application because of security limitations (see cross domain policy). If you need this capability in a Silverlight web application I would suggest performing the search via an ASP.NET proxy (license permitting).

In this sample, I called the Google search API from a WPF application, but it would also work in a WinForms or ASP.NET application as suggested above.

Here is the XAML of the Window that displays the results of the Google search.

<Window x:Class="ESRI.PrototypeLab.MapServiceHarvester.MainWindow"
       xmlns="http://schemas.microsoft.com/winfx/2006/xaml/presentation"
       xmlns:x="http://schemas.microsoft.com/winfx/2006/xaml"
       Height="600"
       Width="800"
       >
    <Grid>
<DataGrid x:Name="DataGridResults" AutoGenerateColumns="True" />
    </Grid>
</Window>

Here is the code behind that makes that performs the internet search and displays the results in the datagrid defined above.

public partial class MainWindow : Window {
    public MainWindow() {
        InitializeComponent();

        this.Loaded += (s, e) => {
            GoogleSearch search = new GoogleSearch() {
                Key = "<enter your key here>",
                CX = "013036536707430787589:_pqjad5hr1a"
            };
            search.SearchCompleted += (a, b) => {
                this.DataGridResults.ItemsSource = b.Response.Items;
            };
            search.Search("gis");
        };
    }
}

And here is the class that calls Google’s custom search API, desterilizes the JSON response and returns the result as single .NET objects.

public class GoogleSearch {
    public GoogleSearch() {
        this.Num = 10;
        this.Start = 1;
        this.SafeLevel = SafeLevel.off;
    }
    //
    // PROPERTIES
    //
    public string Key { get; set; }
    public string CX { get; set; }
    public int Num { get; set; }
    public int Start { get; set; }
    public SafeLevel SafeLevel { get; set; }
    //
    // EVENTS
    //
    public event EventHandler<SearchEventArgs> SearchCompleted;
    //
    // METHODs
    //
    protected void OnSearchCompleted(SearchEventArgs e) {
        if (this.SearchCompleted != null) {
            this.SearchCompleted(this, e);
        }
    }
    public void Search(string search) {
        // Check Parameters
        if (string.IsNullOrWhiteSpace(this.Key)) {
            throw new Exception("Google Search 'Key' cannot be null");
        }
        if (string.IsNullOrWhiteSpace(this.CX)) {
            throw new Exception("Google Search 'CX' cannot be null");
        }
        if (string.IsNullOrWhiteSpace(search)) {
            throw new ArgumentNullException("search");
        }
        if (this.Num < 0 || this.Num > 10) {
            throw new ArgumentNullException("Num must be between 1 and 10");
        }
        if (this.Start < 1 || this.Start > 100) {
            throw new ArgumentNullException("Start must be between 1 and 100");
        }
                            
        // Build Query
        string query = string.Empty;
        query += string.Format("q={0}", search);
        query += string.Format("&key={0}", this.Key);
        query += string.Format("&cx={0}", this.CX);
        query += string.Format("&safe={0}", this.SafeLevel.ToString());
        query += string.Format("&alt={0}", "json");
        query += string.Format("&num={0}", this.Num);
        query += string.Format("&start={0}", this.Start);
           
        // Construct URL
        UriBuilder builder = new UriBuilder() {
            Scheme = Uri.UriSchemeHttps,
            Host = "www.googleapis.com",
            Path = "customsearch/v1",
            Query = query
        };

        // Submit Request
        WebClient w = new WebClient();
        w.DownloadStringCompleted += (a, b) => {
            // Check for errors
            if (b == null) { return; }
            if (b.Error != null) { return; }
            if (string.IsNullOrWhiteSpace(b.Result)) { return; }

            // Desearealize from JSON to .NET objects
            Byte[] bytes = Encoding.Unicode.GetBytes(b.Result);
            MemoryStream memoryStream = new MemoryStream(bytes);
            DataContractJsonSerializer dataContractJsonSerializer =
new DataContractJsonSerializer(typeof(GoogleSearchResponse));
            GoogleSearchResponse googleSearchResponse =
dataContractJsonSerializer.ReadObject(memoryStream) as GoogleSearchResponse;
            memoryStream.Close();

            // Raise Event
            this.OnSearchCompleted(
                new SearchEventArgs() {
                    Response = googleSearchResponse
                }
            );
        };
        w.DownloadStringAsync(builder.Uri);

    }
}

public enum SafeLevel { off, medium, high }

public class SearchEventArgs : EventArgs {
    public GoogleSearchResponse Response { get; set; }
}

[DataContract]
public class GoogleSearchResponse {
    [DataMember(Name = "kind")]
    public string Kind { get; set; }
    [DataMember(Name = "url")]
    public Url Url { get; set; }
    [DataMember(Name = "queries")]
    public Queries Queries { get; set; }
    [DataMember(Name = "context")]
    public Context Context { get; set; }
    [DataMember(Name = "items")]
    public List<Item> Items { get; set; }
}

[DataContract]
public class Url {
    [DataMember(Name = "type")]
    public string Type { get; set; }
    [DataMember(Name = "template")]
    public string Template { get; set; }
}

[DataContract]
public class Queries {
    [DataMember(Name = "nextPage")]
    public List<Page> NextPage { get; set; }
    [DataMember(Name = "request")]
    public List<Page> Request { get; set; }
}

[DataContract]
public class Page {
    [DataMember(Name = "title")]
    public string Title { get; set; }
    [DataMember(Name = "totalResults")]
    public int Request { get; set; }
    [DataMember(Name = "searchTerms")]
    public string SearchTerms { get; set; }
    [DataMember(Name = "count")]
    public int Count { get; set; }
    [DataMember(Name = "startIndex")]
    public int StartIndex { get; set; }
    [DataMember(Name = "inputEncoding")]
    public string InputEncoding { get; set; }
    [DataMember(Name = "outputEncoding")]
    public string OutputEncoding { get; set; }
    [DataMember(Name = "safe")]
    public string Safe { get; set; }
    [DataMember(Name = "cx")]
    public string CX { get; set; }
}

[DataContract]
public class Context {
    [DataMember(Name = "title")]
    public string Title { get; set; }
    [DataMember(Name = "facets")]
    public List<List<Facet>> Facets { get; set; }
}

[DataContract]
public class Facet {
    [DataMember(Name = "label")]
    public string Label { get; set; }
    [DataMember(Name = "anchor")]
    public string Anchor { get; set; }
}

[DataContract]
public class Item {
    [DataMember(Name = "kind")]
    public string Kind { get; set; }
    [DataMember(Name = "title")]
    public string Title { get; set; }
    [DataMember(Name = "htmlTitle")]
    public string HtmlTitle { get; set; }
    [DataMember(Name = "link")]
    public string Link { get; set; }
    [DataMember(Name = "displayLink")]
    public string DisplayLink { get; set; }
    [DataMember(Name = "snippet")]
    public string Snippet { get; set; }
    [DataMember(Name = "htmlSnippet")]
    public string HtmlSnippet { get; set; }
    [DataMember(Name = "cacheId")]
    public string CacheId { get; set; }
    //[DataMember(Name = "pagemap")] *** Cannot deserialize JSON to .NET! ***
    //public Pagemap Pagemap { get; set; }
}

[DataContract]
public class Pagemap {
    [DataMember(Name = "metatags")]
    public List<Dictionary<string, string>> Metatags { get; set; }
}

[DataContract]
public class Metatag {
    [DataMember(Name = "creationdate")]
    public string Creationdate { get; set; }
    [DataMember(Name = "moddate")]
    public string Moddate { get; set; }
}

And lastly, here is the result.

image

The only issue I had with this sample was trying to deserialize the JSON associated with the “pagemap” property (see commented out code above). Any tips would be appreciated.

Wednesday, March 2, 2011

P2P Collaboration in ArcMap

Most collaboration technologies require a central server to manager communication. Email, web browsing and instant messaging all require a server to handle communication between clients. This post re-introduces a sample originally published in May of 2008 that facilitates server-less map collaboration or “peer-to-peer geo-collaboration”.

The new add-in for ArcGIS 10 can be downloaded (with source code) from here.

How to Install:

Download the contribution from the code gallery (link), unzip the file and double click on file with the esriAddIn extension. This will launch the Esri add-in installer, click Install Add-In

How to Uninstall:

The add-in can be removed by clicking Customize > Add-In Manager, selecting P2P Collaboration from the list of installed add-ins and clicking Delete this Add-In.

How to Use:

First, display the collaboration toolbar by clicking Customize > Toolbars > P2P Collaboration. Clicking on the only button on the toolbar will display the p2p collaboration dockable window as shown below.

 image

Before you can collaborate with other peers you must first connect to a mesh (or peer cloud).  A mesh is virtual network comprising of two or more peers.  When the Connect button is clicked the following dialog is displayed.

image

The Username is a friendly name that you want to be identified on the mesh as.  By default, a password is not used. If you specify a password then you will ONLY be able to "see" other peers that used the same password. Using a password is a good method of excluding unwanted peers.

Most P2P applications are considered to be examples of hybrid P2P technology. This is because most rely on some sort of server interaction, such as a DNS server.  In the case of this add-in, a centralized resource is required for peers to find other peers. This central resource is called a peer resolver.

The p2p collaboration add-in supports two resolver types:

  1. PNRP
    Peer Name Resolution Protocol (or PNRP) is a proprietary technology by Microsoft. The add-in supports PNRP 2.0 which is installed by default on computers running Microsoft Windows Vista and an optional install for Microsoft Windows XP SP2.  Unfortunately PNRP is not supported on Microsoft Windows 2003/2008.
  2. Custom
    This is the address of a custom peer resolver running on your network. Details on how to configure and start a custom peer resolver are detailed below. The purpose of the resolver is to exchange IP addresses (and ports) of other peers. All subsequent communication is done on a peer-to-peer basis.

Within a few seconds on connecting you should see the names of other peers appearing in the list. The user in bold is you.

 image

There are five ways you can collaborate with other peers:

  1. Chatting
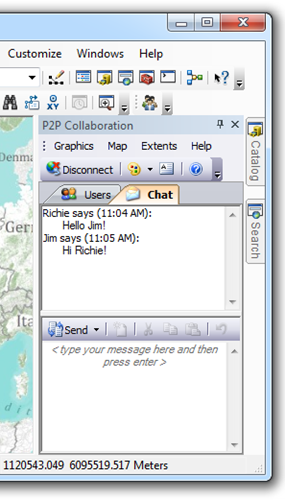
    To chat click the Chat tab and start typing. It is important to note that chatting is communal, that is, all peers see all text messages. 
    image
  2. Publishing geo-referenced screenshots
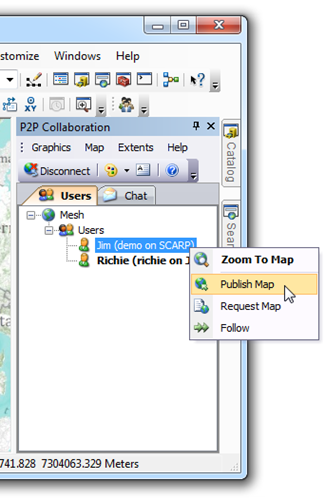
    Returning to the Users tab, if you right click on another peer's name you will see the following context menu appear. Clicking on Publish Map will send your current map display to the selected user.  The selected user (i.e. Jim) will automatically receive a new raster layer in his map document. 
    image
  3. Requesting geo-referenced screenshots
    In the example above, Jim sent a screenshot to Bob. This would have required Bob to make an explicit request to Jim. The p2p collaboration add-in has the capability of requesting a screenshots from other peers without them knowing! To covertly request a screenshot, select Request Map in the context menu. To stop other peers from harvesting screenshots (or "maps") from your computer, unchecked the Map > Share option from the main menu.
    image
  4. Add, removing, editing shared graphics and ink
    Shared graphics is probably the most useful feature of the add-in. All peers can add, remove, edit graphics collectively. A line or box added by one peer can be moved or deleted by another peer. Any graphic from the Drawing toolbar or ink from the Tablet toolbar is supported.

    image  

    By default, all graphics/ink that is added to the map are shared with all other peers. If you want to add graphics/ink to your map without it being shared then you can disable sharing by clicking Graphics > Share
    image 
  5. Share navigation
    From a screenshot above you may have noticed a entry in the peer context menu called Zoom to Map.  This will change your map extent to be same as the peer you selected.  Essentially you can see what areas other people are looking at.  However there is a significantly more advanced feature called shared navigation that allows one peer to control the map display of other peers.  The controlling peer (aka the master) must first enable extent sharing from the main menu (Extents > Share). 
    image

    Other peers (aka slaves) must then subscribe to the master peer’s map extent.  To subscribe to another peers extents click Follow in the peer context menu as shown below. 
    image

If you choose to use PNRP as your organization’s peer resolver then please remember that this is only supported on Microsoft Window XP SP2, Microsoft Windows Vista and Microsoft Windows 7. Another disadvantage of PNRP is that it requires partial support for IPv6. If your network and routes do not support this protocol then PNRP may not function correctly. On Vista, PNRP 2.0 is already installed and running. However, PNRP, by default is not installed on Microsoft Windows XP. To install PNRP on Microsoft Windows XP follow these steps:

  1. In the Control Panel, double-click Add or Remove Programs.
  2. In the Add or Remove Programs dialog box, click Add/Remove Windows Components.
  3. In the Windows Components Wizard, select the "Networking Services" check box and click "Details".
  4. Check the "Peer-to-Peer" check box and click "OK".
  5. Click "Next" in the Windows Components Wizard.
  6. When the installation completes, click "Finish".
  7. From a command shell prompt, start the PNRP service with the following command: net start pnrpsvc.

After installing PNRP on Microsoft Windows XP, there is one more step. The version of PNRP that is included with Microsoft Windows XP is not compatible with Microsoft Windows Vista. To upgrade PNRP 1.0 to the Vista compatible PNRP 2.0 you need to install KB920342 from here.

For greater compatibility, your organization may choose to run a custom peer resolver on your network. The downloadable contribution includes a sample custom peer resolver that is specifically designed for the ArcMap add-in. The customer peer resolver is named ESRI.PrototypeLab.P2P.PeerResolver.exe and is located in the following subdirectory of the download.
ESRI.PrototypeLab.P2P\ESRI.PrototypeLab.P2P.PeerResolver\bin\Release

image

The for best results, leave the Server name as localhost and the Protocol set to Tcp. If there is an obvious port conflict then change it to something else. For example, port 80 might be used by a web server. To start the peer resolver service click Start.  If you close the application by clicking the "X" button then the application will continue running in the windows system tray as shown below.

image

When the peer resolver is minimized to the system tray, use the right click menu (or “context menu”) to start, stop, open or close the resolver.

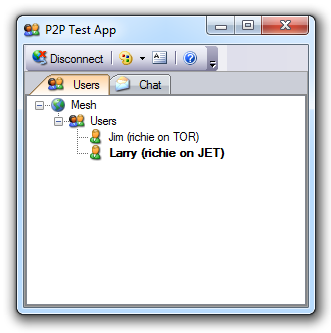
Lastly, to assist with configuring and testing your setup, the download includes a simple test app. This file is called ESRI.PrototypeLab.P2P.Test.exe and is located here:
ESRI.PrototypeLab.P2P\ESRI.PrototypeLab.P2P.Test\bin\Release

image

Wednesday, February 9, 2011

Custom Magnifier for Esri’s Silverlight SDK

Custom Magnifier for Esri’s Silverlight SDK

Map magnifiers are very intuitive and compelling for end users. They allow a user to examine a map in more detail without having to to change the map scale (or “zoom in”). Magnifiers can also be used to like an “x-ray” to reveal alternative content. For example, if a base map shows a street map information for a city, a magnifier could reveal satellite imagery at the same scale.

The ArcGIS Silverlight Toolkit extends ESRI’s ArcGIS API for Microsoft Silverlight with useful widgets like a navigation control, toolbar and two types of magnifiers.

The toolkit’s Magnifier is a control that allows the user to temporarily swipe a stylized magnifying glass over the map. Developers can specify any magnification and any map content for the magnifier.

Magnifier

The toolkit’s MagnifyingGlass is an alternative magnifier with a simpler design. Developers can specify any magnification but are limited to single tiled map service layer for the contents. Unlike the Magnifier described above, this control can resided in the web application permanently. As the base map updates, the extent in the MagnifyingGlass will also update.

MagnifyingGlass

These two controls are very useful but did not satisfy my requirement to have permanent magnifier that supported dynamic layers such as an image service layer. The code below is a blend of both toolkit magnifiers.

Here is the XAML:

<UserControl
   x:Class="TestMagnify.Magnify"
   xmlns="http://schemas.microsoft.com/winfx/2006/xaml/presentation"
   xmlns:x="http://schemas.microsoft.com/winfx/2006/xaml"
   xmlns:d="http://schemas.microsoft.com/expression/blend/2008"
   xmlns:mc="http://schemas.openxmlformats.org/markup-compatibility/2006"
   xmlns:esri="http://schemas.esri.com/arcgis/client/2009"
   mc:Ignorable="d"
   d:DesignHeight="225"
   d:DesignWidth="225"
   Width="225"
   Height="225"
   >
    <Grid x:Name="LayoutRoot">
        <Grid.RenderTransform>
            <TranslateTransform x:Name="Translate" />
        </Grid.RenderTransform>
        <Ellipse x:Name="MagShadow" Margin="-2" Fill="Black">
            <Ellipse.Effect>
                <BlurEffect Radius="25"/>
            </Ellipse.Effect>
        </Ellipse>
        <Ellipse x:Name="MagFrameBack" Margin="0">
            <Ellipse.Fill>
                <LinearGradientBrush EndPoint="0.5,1" StartPoint="0.5,0">
                    <GradientStop Color="#FF000000" Offset="1"/>
                    <GradientStop Color="#FFFFFFFF" Offset="0"/>
                    <GradientStop Color="#FF353535" Offset="0.875"/>
                    <GradientStop Color="#FF515151" Offset="0.21"/>
                </LinearGradientBrush>
            </Ellipse.Fill>
        </Ellipse>
        <Ellipse x:Name="MagFrameFront" Margin="5">
            <Ellipse.Fill>
                <LinearGradientBrush EndPoint="0.5,1" StartPoint="0.5,0">
                    <GradientStop Color="#FF000000"/>
                    <GradientStop Color="#FFFFFFFF" Offset="1"/>
                    <GradientStop Color="#FF505050" Offset="0.134"/>
                    <GradientStop Color="#FE787878" Offset="0.728"/>
                    <GradientStop Color="#FE9D9D9D" Offset="0.915"/>
                </LinearGradientBrush>
            </Ellipse.Fill>
        </Ellipse>
        <Grid Margin="10">
            <Grid.OpacityMask>
                <RadialGradientBrush GradientOrigin="0.5,0.5"
Center="0.5,0.5">
                    <GradientStop Color="White" Offset="0.9999"/>
                    <GradientStop Offset="1"/>
                </RadialGradientBrush>
            </Grid.OpacityMask>
            <esri:Map x:Name="MagMap"
                     IsLogoVisible="False"
                     IsHitTestVisible="False"
                     PanDuration="00:00:00"
                     ZoomDuration="00:00:00"/>
        </Grid>
        <Ellipse x:Name="MagGlass" Stroke="#FF000000" Margin="10">
            <Ellipse.Fill>
                <RadialGradientBrush GradientOrigin="1, 1" Center="0.5,0.5">
                    <GradientStop Color="#48FFFFFF" Offset="0.009"/>
                    <GradientStop Color="#22FFFFFF" Offset="0.107"/>
                    <GradientStop Color="#00BBBBBB" Offset="0.567"/>
                    <GradientStop Color="#00BCBCBC" Offset="0.585"/>
                    <GradientStop Color="#00BBBBBB" Offset="0.625"/>
                    <GradientStop Color="#04C4C4C4" Offset="0.696"/>
                    <GradientStop Color="#1AC4C4C4" Offset="0.888"/>
                    <GradientStop Color="#2FFFFFFF" Offset="1"/>
                </RadialGradientBrush>
            </Ellipse.Fill>
        </Ellipse>
    </Grid>
</UserControl>

Here is the code behind:

using System.Windows;
using System.Windows.Controls;
using System.Windows.Input;
using ESRI.ArcGIS.Client;
using ESRI.ArcGIS.Client.Geometry;

namespace TestMagnify {
    public partial class Magnify : UserControl {
        private Point _begin;
        private Point _current;
        private Cursor _cursor = null;
        private bool _isdrag = false;
        //
        public Magnify() {
            InitializeComponent();
            this.MouseLeftButtonDown += this.MagnifyBox_MouseLeftButtonDown;
            this.MouseLeftButtonUp += this.MagnifyBox_MouseLeftButtonUp;
            this.MouseMove += this.MagnifyBox_MouseMove;
        }
        public static readonly DependencyProperty MapProperty =
            DependencyProperty.Register(
                "Map",
                typeof(Map),
                typeof(Magnify),
                new PropertyMetadata(Magnify.OnMapPropertyChanged));
        public static readonly DependencyProperty LayersProperty =
            DependencyProperty.RegisterAttached(
                "Layers",
                typeof(LayerCollection),
                typeof(Magnify),
                new PropertyMetadata(Magnify.OnLayersPropertyChanged));
        public static readonly DependencyProperty ZoomFactorProperty =
            DependencyProperty.Register(
                "ZoomFactor",
                typeof(double),
                typeof(Magnify),
                new PropertyMetadata(2d,
Magnify.OnZoomFactorPropertyChanged));
        public Map Map {
            get { return (Map)this.GetValue(MapProperty); }
            set { this.SetValue(MapProperty, value); }
        }
        public LayerCollection Layers {
            get { return (LayerCollection)GetValue(LayersProperty); }
            set { SetValue(LayersProperty, value); }
        }
        public double ZoomFactor {
            get { return (double)this.GetValue(ZoomFactorProperty); }
            set { this.SetValue(ZoomFactorProperty, value); }
        }
        private static void OnLayersPropertyChanged(DependencyObject d,
DependencyPropertyChangedEventArgs e) {
            Magnify magnify = d as Magnify;
            if (magnify.MagMap != null) {
                magnify.MagMap.Layers = e.NewValue as LayerCollection;
            }
        }
        private static void OnMapPropertyChanged(DependencyObject d,
DependencyPropertyChangedEventArgs e) {
            Magnify glass = d as Magnify;
            Map mapOld = e.OldValue as Map;
            if (mapOld != null) {
                mapOld.ExtentChanged -= glass.Map_ExtentChanged;
            }
            Map mapNew = e.NewValue as Map;
            if (mapNew != null) {
                mapNew.ExtentChanged += glass.Map_ExtentChanged;
            }
        }
        private static void OnZoomFactorPropertyChanged(DependencyObject d,
DependencyPropertyChangedEventArgs e) {
            (d as Magnify).UpdateMagnifier();
        }
        private void Map_ExtentChanged(object sender, ExtentEventArgs e) {
            this.UpdateMagnifier();
        }
        private void MagnifyBox_MouseLeftButtonDown(object sender,
MouseButtonEventArgs e) {
            this._isdrag = true;
            this._cursor = this.Cursor;
            this._begin = e.GetPosition(null);
            this.Cursor = Cursors.None;
            this.CaptureMouse();
        }
        private void MagnifyBox_MouseLeftButtonUp(object sender,
MouseButtonEventArgs e) {
            if (this._isdrag) {
                this._isdrag = false;
                this.ReleaseMouseCapture();
                this.UpdateMagnifier();
            }
            this.Cursor = this._cursor;
        }
        private void MagnifyBox_MouseMove(object sender, MouseEventArgs e) {
            if (this._isdrag) {
                this._current = e.GetPosition(null);
                double x = this._current.X - this._begin.X;
                double y = this._current.Y - this._begin.Y;
                if (this.FlowDirection == FlowDirection.RightToLeft) {
                    x *= -1d;
                }
                this.Translate.X += x;
                this.Translate.Y += y;
                this._begin = this._current;
            }
        }
        private void UpdateMagnifier() {
            if (this.Visibility == Visibility.Collapsed) { return; }
            if (this.Map == null) { return; }
            Point point = this.TransformToVisual(this.Map).Transform(
                new Point(
                    this.RenderSize.Width * 0.5d + this.Translate.X,
                    this.RenderSize.Height * 0.5d + this.Translate.Y
                )
            );
            MapPoint center = this.Map.ScreenToMap(point);
            double resolution = this.Map.Resolution;
            double zoomResolution = resolution / this.ZoomFactor;
            double width = 0.5d * this.MagMap.ActualWidth * zoomResolution;
            Envelope envelope = new Envelope() {
                XMin = center.X - width,
                YMin = center.Y - width,
                XMax = center.X + width,
                YMax = center.Y + width,
                SpatialReference = this.MagMap.SpatialReference
            };
            this.MagMap.Extent = envelope;
        }
    }
}

Here is how to use it:

<UserControl
   x:Class="TestMagnify.MainPage"
   xmlns="http://schemas.microsoft.com/winfx/2006/xaml/presentation"
   xmlns:x="http://schemas.microsoft.com/winfx/2006/xaml"
   xmlns:d="http://schemas.microsoft.com/expression/blend/2008"
   xmlns:mc="http://schemas.openxmlformats.org/markup-compatibility/2006"
   xmlns:esri="http://schemas.esri.com/arcgis/client/2009"
   xmlns:local="clr-namespace:TestMagnify"
   mc:Ignorable="d"
   d:DesignHeight="300" d:DesignWidth="400">
    <Grid x:Name="LayoutRoot" Background="White">
        <esri:Map x:Name="Map">
            <esri:ArcGISImageServiceLayer
               Url="http://sampleserver3.arcgisonline.com ~
/ArcGIS/rest/services/Portland/Aerial/ImageServer"

               ImageFormat="JPGPNG" />
        </esri:Map>
        <local:Magnify x:Name="Magnify"
                      Map="{Binding ElementName=Map}"
                      ZoomFactor="5">
            <local:Magnify.Layers>
                <esri:LayerCollection>
                    <esri:ArcGISImageServiceLayer
                       Url="http://sampleserver3.arcgisonline.com ~
/ArcGIS/rest/services/Portland/Aerial/ImageServer"

                       ImageFormat="JPGPNG" />
                </esri:LayerCollection>
            </local:Magnify.Layers>
        </local:Magnify>
    </Grid>
</UserControl>

Note: “~” denotes an editorial line continuation.

In conclusion, based on source code extracted from Esri’s ArcGIS Silverlight toolkit project page on codeplex, I was able to create a new magnifier that could support any layer or layers regardless of type. In order to support dynamic layers such an image service layers the new magnifier had to reserve updates until after a drag operation is completed. This is not ideal but unavoidable.

Using this code I hope you can explore some innovative variants like “x-ray” controls. Fun and productive controls like these are being increasingly important as web apps are becoming more tactile with touch support in new hardware like this.