Recently posted on ESRI's ArcScripts website is a set of commands for ArcMap targeting the capabilities of a Tablet PC. Specifically, digital ink, text recognition, text-to-speech (TTS) and speech recognition.
The ArcGIS Tablet Editor can be downloaded from here:
http://arcscripts.esri.com/details.asp?dbid=14921 (full source code provided)
Prerequisites:
Microsoft Windows XP TabletPC Edition
ESRI ArcGIS Desktop 9.2
Microsoft .NET Framework 2.0
ESRI .NET Support (click here to learn how to install)
How to Install:
Download the ZIP file from ArcScripts
Unzip the download
Double click on the "msi" file. Follow the install wizard instructions.
How to get started?
Start ArcMap (Windows: Start > ArcGIS > ArcMap)
Display the Tablet Editor toolbar (ArcMap: View > Toolbars > Tablet Editor)
Load a map document. To show some of the advanced capabilities add one or more layers with a unique renderer.
Demonstration Screenshots:

The Feature Selector Tool
To select features using ink first click on a layer in the ArcMap table of contents and then activate the Feature Selection tool on the Tablet Editor toolbar. Using your pointing device drag your mouse over the screen. As soon as you lift the mouse/pen, features from the selected layer will be selected (if inside the ink).

The Verbal Dimensioning Tool
Click on the Verbal Dimensioning Tool (third from left) on the Tablet Editor Toolbar. Drag straight ink line on screen. The computer will speak the length in the current map units, for example. "Eighty Four Meters". Lengths will be rounded to the nearest map unit.

The Add Features Tool
Now, start an edit session (click Editor > Start Editing from the Editor Toolbar). Select the layer in the ArcMap table of contents that you would like to add features to. In the screenshot above the user would like to add more light poles. Click the Add Features Tool (first button on Tablet Editor toolbar) and draw small marks on the screen as shown above. When done, make a right-up gesture with your pointing device. This will cause the small ink dashes to turn into new light poles.

The Attribute Transfer Tool
Using the Add Feature Tool in the previous step, four new Light Poles were added. The new light poles adopted whatever default values were associated with the parent featureclass (and/or subtype). With the Light Poles layer still selected in the ArcMap table of contents click the Attribute Transfer Tool (second button on the Tablet Editor Toolbar). Draw two ink rings, each circling a light pole. When the right-up gestures is used, attributes from the pole selected with the first ink stroke will be transfer to the pole(s) selected with the second ink stroke.
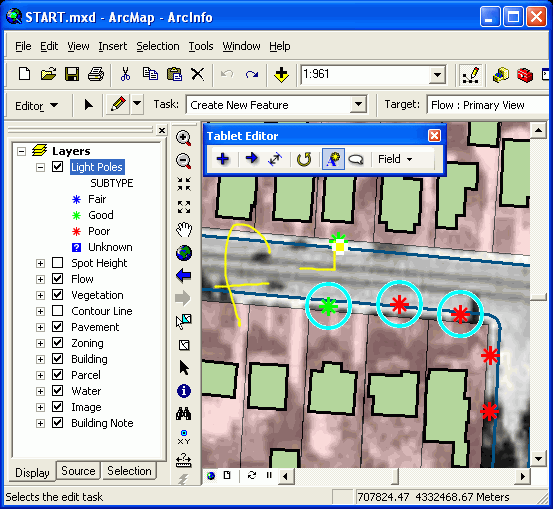
The Ink Updater
Again, whilst still in an edit session and with the Light Poles layer selected in the ArcMap table of contents select a few poles with the Feature Selector Tool (as show previously). Now click the Ink Updater tool (the fifth button on the Tablet Editor toolbar). Because the selected layer is using a unique renderer the user can reclassify the selected poles by writing "f" followed by a right-up gesture. The Tablet Editor will use the ink text to find the first matching description (if any) in the layer and update the attributes accordingly. If the layer does not have a unique renderer or if you want to explicitly select a field to update then you can click the Field Drop down menu to pick a field to edit. The ink Updater is smart enough to convert ink into the appropriate data format, for example, ink will be converted to a date if a date field is selected.
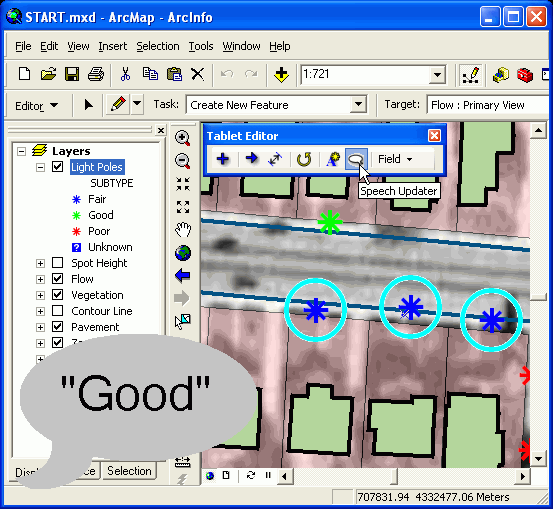
The Speech Updater
This is probably the coolest tool on the Tablet Editor toolbar. The user is still in an edit session, there are three light poles selected in the map and the Light Poles layer is selected in the ArcMap table of contents. Click the Speech Updater button (sixth button on the Tablet Editor toolbar). Now, say "Good". The Tablet Editor will automatically reclassify the poles as "Good". This tool will work with ANY layer that has a unique value rendered with descriptions in readable English.


