Most collaboration technologies require a central server to manager communication. Email, web browsing and instant messaging all require a server to handle communication between clients. This post introduces a new prototype that allows collaboration without the need of an intermediate server.
The ESRI Prototype Lab have developed a peer-to-peer (or P2P) extension to ArcGIS Desktop called G2G. G2G is currently supported in ArcMap as an extra tab in the table of contents as shown below.
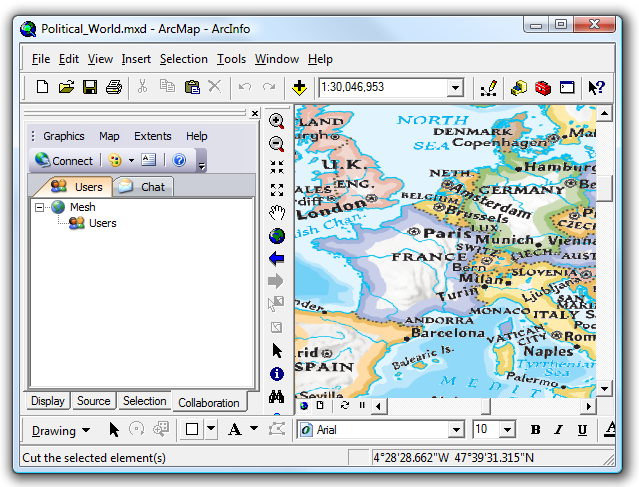
Before you can collaborate with other peers you must first connect to a mesh (or peer cloud). A mesh is virtual network comprising of two or more peers. When the user clicks Connect in the Collaboration tab the following dialog is displayed.

The Username is a friendly name that you want to be identified on the mesh as. By default, a password is not used. If you specify a password then you will ONLY be able to "see" other peers that used the same password. Using a password is a good method of excluding unwanted peers.
Most P2P applications are considered to be examples of hybrid P2P technology. This is because most rely on some sort of server interaction, such as a DNS server. In the case of G2G, a centralized resource is required to for peers to find other peers. This central resource is called a peer resolver.
G2G supports two resolver types:
- PNRP
Peer Name Resolution Protocol (or PNRP) is a proprietary technology by Microsoft. G2G supports PNRP 2.0 which is installed by default on computers running Microsoft Windows Vista and an optional install for Microsoft Windows XP SP2. Unfortunately PNRP is not supported on Microsoft Windows 2003/2008. - Custom
This is the address of a G2G peer resolver running on your network. Details on how to start a G2G peer resolver are detailed below. The purpose of the resolver is to exchange IP addresses (and ports) of other peers. All subsequent communication is done on a peer-to-peer basis.
Within a few seconds on connecting you should see the names of other peers appearing in the list. The user in bold is you.

There are five ways you can collaborate with other peers:
- Chatting
To chat click the Chat tab and start typing. It is important to note that chatting is communal, that is, all peers see all text messages.
Note: Click the Enter key will not send the text. Please click on the Send button on the chat toolbar. - Publishing geo-referenced screenshots
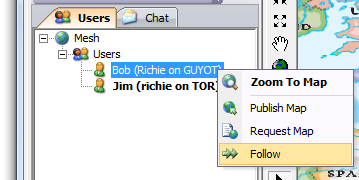
Returning to the Users tab, if you right click on another peer's name you will see the following context menu appear. Clicking on Publish Map will send your current map display to the selected user. The selected user (ie Bob) will automatically receive a new raster layer in his map document.
- Requesting geo-referenced screenshots
In the example above, Jim sent a screenshot to Bob. This would have required Bob to make an explicit request to Jim. G2G has the capability of requesting a screenshots from other peers without them knowing. To covertly request a screenshot, select Request Map in the context menu. To stop other peers from harvesting screenshots (or "maps") from your computer, unchecked the Map > Share option from the main menu.
- Add, removing, editing shared graphics and ink
Shared graphics is probably the most useful feature of G2G. All peers can add, remove, edit graphics collectively. A line or box added by one peer can be moved or deleted by another peer. Any graphic from the Drawing toolbar and ink from the Tablet toolbar is supported.
By default, all graphics/ink that is added to the map are shared with all other peers. If you want to add graphics/ink to your map without it being shared then you can disable sharing by clicking Graphics > Share.
- Share navigation
From a screenshot above you may have noticed a entry in the peer context menu called Zoom to Map. This will change your map extent to be same as the peer you selected. Essentially you can see what areas other people are looking at. However there is a significantly more advanced feature called shared navigation that allows one peer to control the map display of other peers. The controlling peer (aka the master) must first enable extent sharing from the main menu (Extents > Share).
Other peers (aka slaves) must then subscribe to the master peers map extent. To subscribe to another peers extents click Follow in the peer context menu as shown below.


If you choose to use PNRP as your organizations peer resolver then please remember that this is only supported on Microsoft Windows Vista and Microsoft Window XP SP2+. Another disadvantage of PNRP is that requires partial support for IPv6. If you network and routes do not support this protocol then PNRP may not function correctly. On Vista, PNRP 2.0 is already installed and running. However, PNRP by default is not installed on Microsoft Windows XP. To install PNRP on Microsoft Windows XP follow these steps:
- In the Control Panel, double-click Add or Remove Programs.
- In the Add or Remove Programs dialog box, click Add/Remove Windows Components.
- In the Windows Components Wizard, select the "Networking Services" check box and click "Details".
- Check the "Peer-to-Peer" check box and click "OK".
- Click "Next" in the Windows Components Wizard.
- When the installation completes, click "Finish".
- From a command shell prompt, start the PNRP service with the following command: net start pnrpsvc.
After installing PNRP on Microsoft Windows XP, there is one more step. The version of PNRP that is included with Microsoft Windows XP not compatible with Microsoft Windows Vista. To upgrade PNRP 1.0 to the Vista compatible PNRP 2.0 you need to install KB920342 from here.
For greater compatibility, your organization may choose to run the G2G Peer Resolver on your network. This is a custom peer resolver that is specifically designed for the G2G application. Currently the G2G Peer Resolver is bundled with G2G for ArcGIS Desktop. To start the resolver click START > All Programs > G2G for ArcGIS Desktop > G2G Peer Resolver.

The for best results, leave the Server name as localhost and the Protocol set to Tcp. If there is an obvious port conflict then change it to something else. For example, port 80 might be used by a web server. To start the peer resolver service click Start. If you close the application by clicking the "X" button then the application will continue running in the windows system tray.

When the G2G Peer Resolver is minimized to the system tray, use the right click menu (or context menu) to start, stop, open or close the resolver.
If you have comments or suggestions then please don't hesitate to contact us.
Copyright © 2008 ESRI. All rights reserved.
No comments:
Post a Comment